
How to run these tutorials#
The tutorials are in the form of Jupyter notebooks, a powerful tool for interactive computing. Jupyter notebooks allow you to write and execute code, view the results, and add explanatory text all in one document. They are widely used in data science, research, and education due to their versatility and ease of use.
You will not need to install any software to work with Jupyter notebooks, as there are several free cloud-based services available for creating, editing, running, and exporting notebooks. These services provide a hassle-free environment where you can focus on your analysis without worrying about software installation or compatibility issues.
On this guide you find the description of a range of cloud based services for running notebooks available to you, and the information and guidance required to set yourself up to run the Jupyter Notebooks through your desktop or laptop in case you prefer this option.
Possible cloud-based services#
These cloud-based services represent only a selection of the available options for running notebooks in the cloud. Users can leverage these services to execute Jupyter notebooks without the need to install any software locally. However, it’s essential to note that this selection is not exhaustive, and users may explore other cloud-based platforms tailored to their specific needs and preferences.
WEKEO
WEKEO is the EU Copernicus DIAS reference service for environmental data, virtual processing environments, and skilled user support. It is a platform for all audiences. This is our official platform for accessing the notebooks. You can access every notebook by clicking on the WEkEO link, which will redirect you to our official website. From there, you can open the notebook directly in JupyterHub. You need to be signed up to access the notebooks.
Warning
Be aware that the free cloud-based services described below are not supported by ECMWF
Binder
![]()
Note
Binder may take some time to load, so please be patient!
Click on the Binder badge
Wait for the Binder environment to load.
Once loaded, navigate to the desired notebook and click on it to open and interact with it.
Kaggle

Note
Requires (free) registration with Kaggle. Once in, switch on the internet via settings.
Click on the Kaggle badge
If you’re not logged in to Kaggle, sign in or create a free account.
After signing in, you’ll be redirected to the Kaggle notebook interface with the option to open the notebook. Click on it to proceed.
Colab
Note
Requires Google account, and installation of some libraries, you can add our requirements.txt file and install all of them with pip install -r requirements.txt
![]()
Click on the Colab badge
If prompted, sign in to your Google account.
Once signed in, the notebook will open in Google Colab. You can then interact with and run the notebook in the Colab environment.
Run the notebooks locally#
On this section we are going to give you the information and the steps required to download, set up, and then run the notebooks on your own desktop and laptop.
Key concepts
If you are considering to work with the Jupyter Notebooks on your own desktop or laptop, it is important that you are aware of some key concepts or information that you’ll find in this tutorial or during the preparation and installation process.
Dependencies are all of the software components required by your notebook in for it to work as intended and avoid runtime errors. They can be libraries, frameworks, or other programs.
Packages are a way to organize and group together related dependencies. They act like toolboxes, storing and organizing tools making easier to install and manage dependencies.
Conflicting dependencies or dependency hell are issues that occur when two or more packages that are sharing dependencies in a project, require different versions of the same software component. Because only a single version of a dependency is permitted in any project’s environment.
Environments are directories that contain a specific collection of packages that you have installed. You may have several environments with different versions for the same dependecy. If you change one environment, your other environments are not affected. There is a
base environmentlocated at the root directory that contains the system installation parameters.Git is a distributed version control system that intelligently tracks changes in files. It is particularly useful when you and a group of people are all making changes to the same files at the same time.
GitHub is a cloud-based platform where you can store, share, and work together with others to write code.
Repository is the most basic element of GitHub. Here you can find and store the code, the files, and each file’s revision history. Repositories can have multiple collaborators and can be either public, internal, or private.
Terminal is a text input and ouput environment. It is a program that allows us to enter commands that the computer processess.
Shell is a programme that acts like a command-line interpreter. It interprets and processes the commands entered by the user into the terminal, and outputs the results.
Activation the activation of an environment makes all its contents available to your terminal or shell.
The Deactivation of an environment is the opposite operation of activation, removing from your shell what makes the environment content accessible.
Pip is the standard tool for installing or uninstalling Python packages and managing their dependencies. For more information visit pip documentation.
Conda is an open-source, cross-platform package manager and environment management system which can be used to create Python and R development environments on many different platforms. It is particularly beneficial for data scientists, researchers, and developers working with diverse software requirements across different projects. For more information visit Conda Documentation
Conda channels are the locations where packages are stored. They serve as the base for hosting and managing packages. Remote channels like conda-forge offer a wide range of community-maintained packages, expanding the available options for software development and experimentation.
Conda-forge is a community channel made up of thousands of contributors, which contains repositories of conda recipes and thus provides conda packages for a wide range of software. The
conda-forgechannel is free for all to use. For more information visit conda-forge documentation.
Download a submodule repository#
Note
In our github repository you can find a set of repositories in the submodules/ folder where you can find all the Jupyter Notebooks grouped in several topics as structured in the left menu bar.
If you have experience using git, we recommend working with git on the command line to download and get access to the Jupyter Notebooks. If you have never used git, you can download the submodules via the GitHub website.
Clone with git
You will need to have git installed to follow the steps below.
Here we show how to download the [reanalysis submodule repository](ecmwf-training/c3s-training-submodule-reanalysiry as an example, but you can follow the same steps for any other submodule repository.
Open a terminal
Clone the repository with
git clone https://github.com/ecmwf-training/c3s-training-submodule-reanalysis.git
or (alternatively) use ssh if you have access configured for your GitHub account:
git clone git@github.com:ecmwf-training/c3s-training-submodule-reanalysis.git
Move into the cloned directory
cd ecmwf-training/c3s-training-submodule-reanalysis
Download from GitHub website
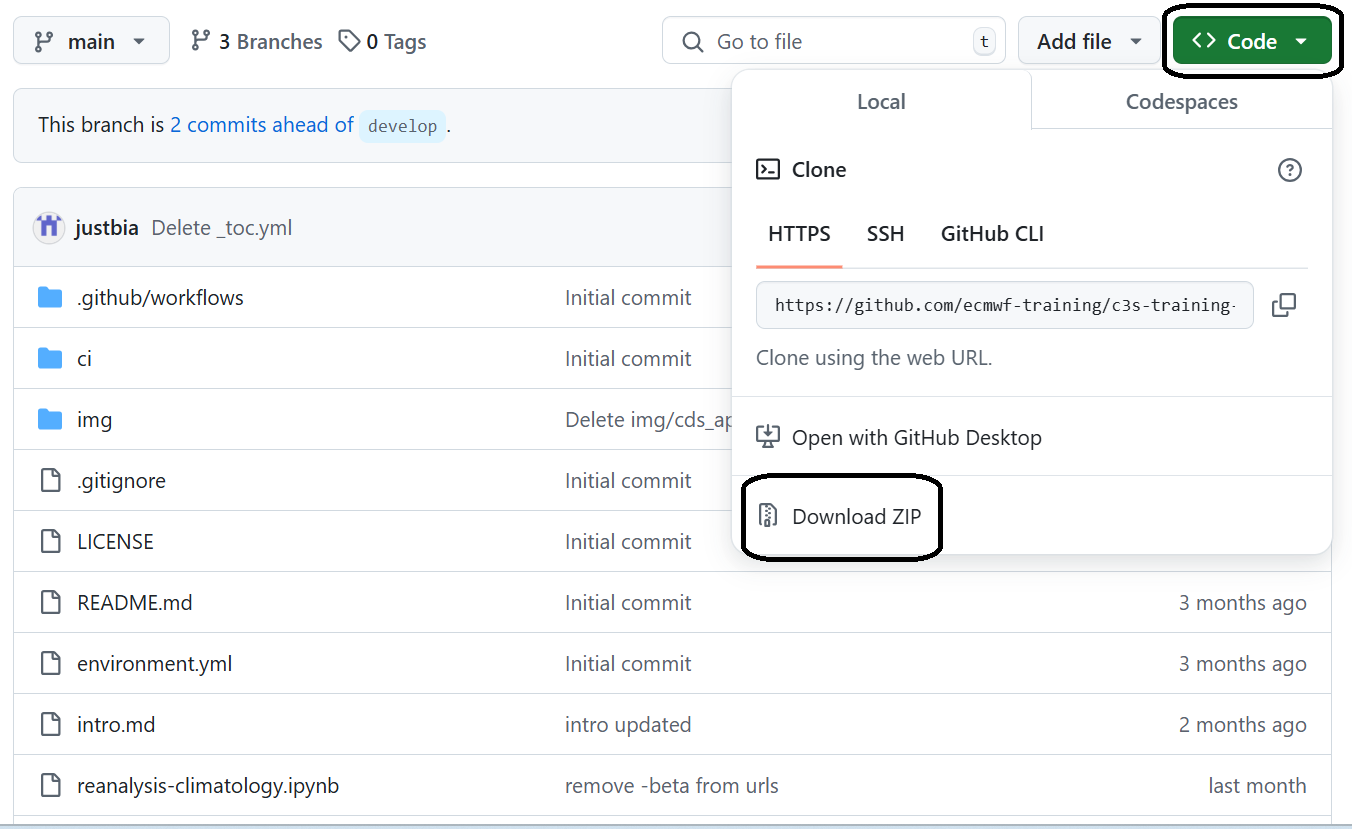
Go to the
submodules/folder and pick the submodule repository you want to download, e.g. reanalysis submodule repository.First click on the <> Code button and then Download ZIP file.
Unzip the file using your favourite tools
Open a terminal inside the unzipped folder
Conda installation#
To run the notebooks in your own environment, we suggest you use Conda. Using conda provides a streamlined approach to package management, platform compatibility, environment isolation, and access to an extensive package ecosystem. Conda is available on Windows, macOS, or Linux and can be used with any terminal application (or shell).
We suggest you use the Miniforge installer, that is maintained by the conda-forge community that comes preconfigured for use with the conda-forge channel.
Basic installations instructions are available below. More detailed instructions are available in this github repository.
Unix-like platforms (Mac OS & Linux)
Download the installer from Miniforge and run from the terminal bash Miniforge3-$(uname)-$(uname -m).sh.
Windows
Download and execute the Windows installer from Miniforge.
Note
There are several installers that you could use to install Conda. For more information about that visit Installing conda
Setting a virtual environment#
In our notebooks we use packages that don’t come as part of the standard dependencies of Python and some of these packages need specific dependency versions that could be in conflict with other applications or projects in our local environment. The solution to this problem is to create an environment where we are able to set up the versions and conditions to the relevant dependencies. You can easily activate or deactivate environments, which is how you switch between them. You can also share your environment with someone by giving them a copy of your environment.yml file.
With conda, you can create, export, list, remove, and update environments that have different versions of Python and/or packages installed in them. Switching or moving between environments is called activating the environment. You can also share an environment file. For more information about that visit Managing environments
In all our github repositories you can find a environment.yml file, containing the conda channels and a list of python dependencies needed for running our notebooks, as presented in the figure below.
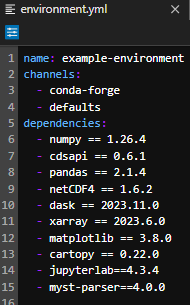
The list of dependencies are presented with their relevant and required version in a format “dependency_name == version”. You can specify the version of a dependency using ==,>,>=,<, <=, and so on. Omitting the version specifier installs the latest version.
To create an environment with all the dependencies listed in the environment.yml file you will need to use the terminal following the next steps.
Create the environment from the environment.yml file. The first line of the
environment.ymlfile sets the new environment’s name.conda env create -f environment.ymlActivate the environment file.
conda activate example-environmentVerify that the environment is installed correctly and check the list of environments available.
conda env list
Note
To deactivate an environment, type in the command line: `conda deactivate
Installing additional dependencies#
In addition to the dependencies installed through the environment.yml file, there are some additional dependencies that may be required for some particular notebooks and that are not avaliable through the channels defined in the environment.yml file.
Those dependecies are installed in each particular notebook through the conda install command or through the pip install command.
conda install is the conda installer command that allows you to install a list of packages and softwares into a specified conda environment.
pip install is the Python installer command that allows you to install Python packages and that it is presented in some Jupyter Notebooks due to particular dependencies that are not available through the conda installer.
Running and visualization of notebooks#
To visualize and execute the notebooks, we recommend using JupyterLab, a versatile web-based interactive development environment. You can interact with our notebooks in this environment locally. JupyterLab is one of the dependencies listed in the environment.yml file presented in the repository and it is installed as soon as you install and activate the environment.
Note
If you prefer a lightweight interface and want to consume less resources, you may consider downloading Jupyter Notebook interface instead of JupyterLab. This interface provides a basic yet efficient environment for running your notebooks without consuming as many resources. It’s a great option for users who prioritize simplicity and performance in their workflow. Here’s documentation of Jupyter Notebook interface
Launch JupyterLab:
After installing JupyterLab, open your terminal or command prompt.
Type
jupyter laband press Enter to launch JupyterLab. This will start a local server and open JupyterLab in your default web browser.
Check the JupyterLab documentation!
Access JupyterLab interface:
Once JupyterLab is launched, you will see the JupyterLab interface in your web browser. It consists of a file browser on the left and a main work area on the right.
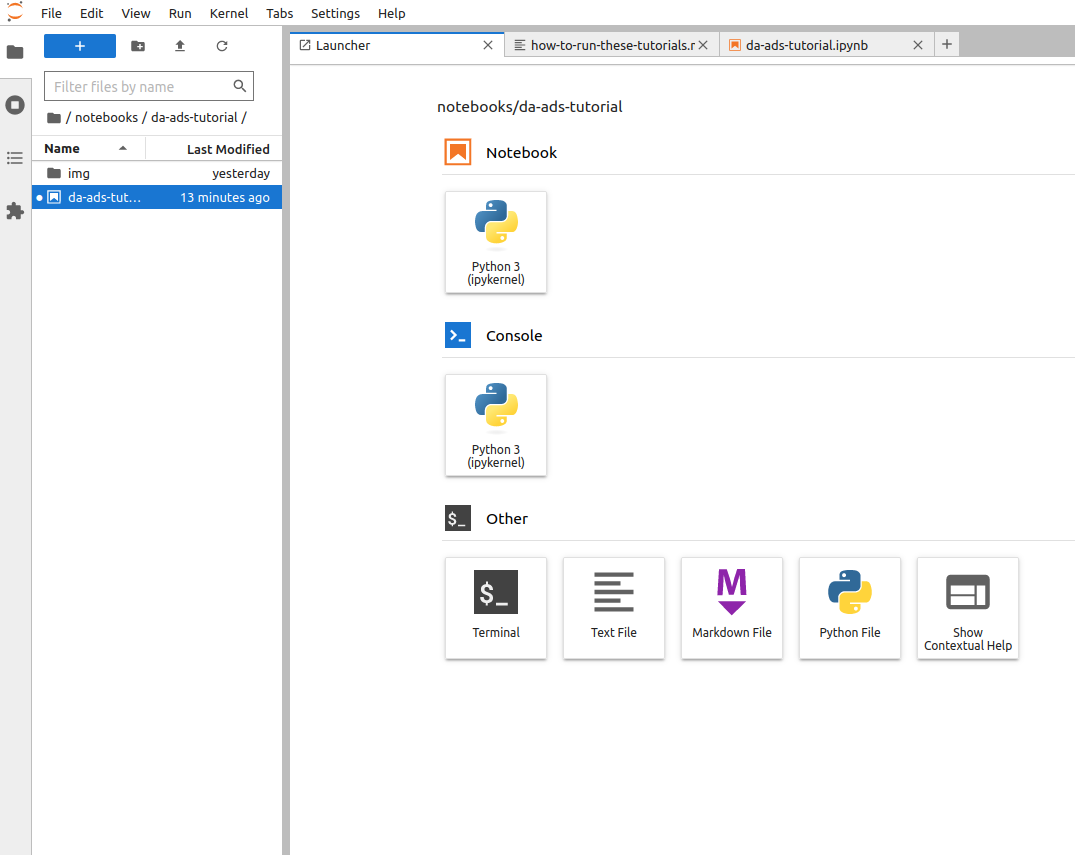
Open a notebook:
Navigate to the directory where your notebook is located using the file browser on the left.
Click on the notebook file (usually with a
.ipynbextension) to open it in JupyterLab.The notebook will open in a new tab within the main work area of JupyterLab.4
Run the notebook:
You can now interact with the notebook by running code cells, editing text, and executing various commands.
To run a code cell, select it and either click the “Run” button in the toolbar or press Shift + Enter.
Explore the different features of JupyterLab to customize your workflow and make the most out of your notebook experience.
Note
These tutorials provide practical guides on how to work with C3S data. They can be run without need for installation, and can be fully adapted to suit your needs!